Static Routing

Static routing is a straight forward process. If you want packets to be routed between two routers, update each router’s routing table with the network address of the other router as well as the path to get there

This is how it is done,
  • Name the routers and give the Ethernet and Serial ports desired IP address

  • When you give IP addresses, make sure the serial link that connects both the router are in same network

  • Add the destination network to each router’s routing table using the add route command in the Global config mode.

Let’s configure static routing in the network shown below,

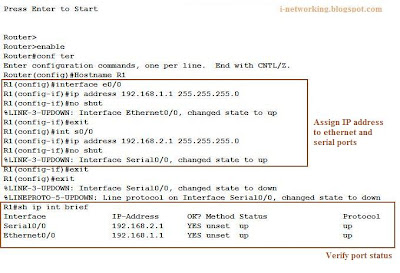
  • Assign IP address to the Ethernet and Serial ports of the first router R1
  • Set the clock rate to 64000 at the serial port of DCE - Data Communication End. When two routers are connected in a network, one acts as the DCE and the other as a DTE – Data Termination End

.

  • Now add the destination network to the routing table and check whether it is connected serially using show ip route command


  • The same procedure is done on the second router. Once this is done, you can ping all the ports successfully

Digg ThisAdd To Del.icio.us Add To Furl Add To Reddit Fav This With Technorati Add To Yahoo MyWeb Add To Newsvine Add To Google Bookmarks Add To Bloglines Add To Ask Add To Windows Live Add To Slashdot Stumble This

Routing Basics

Routing Basics
The router must know the following details in order to route packets to the destined address
  • Destination Address
  • Neighbor routers from which it can learn about remote networks
  • Possible routes to all remote networks
  • The best route to each remote network

The router can learn these information from the neighboring router or an administrator can manually feed all these information. In dynamic routing, the routing table is automatically updated with all these information. In case of static routing an administrator has to manually feed in the network details of the neighboring as well as remote networks for the packet to be route and every time a device is added or removed, the administrator has to manually update each and every routing table

Digg ThisAdd To Del.icio.us Add To Furl Add To Reddit Fav This With Technorati Add To Yahoo MyWeb Add To Newsvine Add To Google Bookmarks Add To Bloglines Add To Ask Add To Windows Live Add To Slashdot Stumble This

Configuring a Cisco Router

In the previous posts, I have explained how to upload the IOS and create a start up configuration, now we can configure the router which includes naming and setting passwords.


Name the Router: An un-configured router will show the device name as Router> by default; you have to give it a specific name so that it can be identified easily in a network. For this, we enter the Privilege EXEC mode and give it a host name,

Router>
Router>enable
Router#configure terminal
Router(config)#hostname CORE
CORE(config)

Now we have named the Router as ‘CORE’. This is the same way how you name a Cisco Switch.


Password protecting a router: There are three types of password that can be use to control access on a router. The first one is to limit access to the User EXEC mode; the second one is to limit access to the Privileged EXEC mode and the third one to limit access to the router through telnet.

Console Password: The console password would limit access to the User EXEC mode in a router, which means that if someone connects a PC to the router, he won’t be able to get to the User EXEC mode.


CORE>enable
CORE#configure terminal
CORE(config)#line console 0
CORE(config-line)#password 12345
CORE(config-line)#login
CORE(config-line)#exit


It’s important to use the login command because it’s like asking the router to prompt for the password when someone tries to login. Without the login command, the user won’t be asked for a password.


Enable Mode Password: This password control access to the Privileged EXEC mode. So you can give the user a low level access with the console password and a high level access with the enable mode password.
Continuing with the above configuration,


CORE(config)#enable password 121212
CORE(config)#enable secret NETWORK


There are two ways of setting enable password, you can either use the command enable password or enable secret . The difference is that if don’t use enable secret, the password you type in will appear in the running configuration as plain text, but if you use the enable secret command, the password will be encrypted. If you use both the methods like I did in the above configuration, only the encrypted password will be accepted.


Telnet Password: Telnet is used to login to a router remotely. While the two passwords explained above are optional, Telnet won’t work unless and until you set a password for Telnet in your router.


CORE(config)#line vty 0 4
CORE(config-line)#password CISCO
CORE(config-line)#login


Here vty 0 4 refers to 5 virtual terminals, which means that 5 users can connect to your router at the same time.
This is how the configuration would look like,

Now we have to save this configuration in the NVRAM, so that in case you have to reboot the router, the configuration is not erased. For this, you can use ‘Write’ of ‘copy running-config startup-config’. This procedure can be anytime while configuring also.

If you run ‘show run’ command, you can see that only the enable mode password is encrypted, the rest are in plaintext. In order to encrypt the entire password you can run the ‘Service password-encryption’ in the config mode.

Digg ThisAdd To Del.icio.us Add To Furl Add To Reddit Fav This With Technorati Add To Yahoo MyWeb Add To Newsvine Add To Google Bookmarks Add To Bloglines Add To Ask Add To Windows Live Add To Slashdot Stumble This

Router booting process

The points below are the step by step process which runs in a router when you switch it on.

  • The first thing it does is a POST, Power On Self Test, which checks whether all the components like the fan, interfaces, memory and CPU are working.
  • The router then loads the IOS. There are three possible locations to find an IOS,

- Flash Memory, which is the default location

- TFTP server

- ROM, the router will boot in the ROM Monitor Mode


  • Now the router has booted up and it looks for a startup configuration file in the NVRAM. Whenever we configure a router, the changes are done in the RAM memory and it has to copied to the NVRAM (Non-Volatile RAM) using the ‘write’ command, so that when you restart the router the startup configuration file is still there.
  • If there is no valid startup configuration file, the router prompts you to go to a set up mode. This is a tedious method, so type No and then the router prompts whether you would like to have an auto install. Press Enter key. The router auto configures and takes you to the User EXEC mode.

Now you have a fresh Cisco router with an IOS and a startup configuration, the next thing we configure is Host names and password for access control.

Digg ThisAdd To Del.icio.us Add To Furl Add To Reddit Fav This With Technorati Add To Yahoo MyWeb Add To Newsvine Add To Google Bookmarks Add To Bloglines Add To Ask Add To Windows Live Add To Slashdot Stumble This

Setting up a Cisco Device – Installing IOS

IOS, as you know refers to Internetwork Operating System which works only on Cisco devices; it comes in the form of binary (.Bin) file. While selecting an IOS image, you have to first check whether it’s compatible with your device.

The naming of the IOS image is done in such a manner that it contains the compatible device name, the version, in which memory the IOS is going to run and the compression type.

PPPPP - FFFF - MM

• ‘P’ refers to the Platform. It’s usually the device name. Keep in mind that it may not be a router always, but can be any Cisco device that runs on an IOS.
• ‘F’ refers to the features. Like n for IPX, d for Desktop Subset etc.
• The first ‘M’ refers to the run time memory, i.e. where the image is going to run on the router. (F-Flash, M-RAM, R-ROM, L-Relocated at run time)
• The second ‘M’ refers to the compression technique used to compress the image so that it can be transferred to the router. (Z-Zip Compression, X-MZIP Compression, W-STAC Compression)

Examples of an image file c3640–ds–mz.

Getting ready to upload an image file:
If you are uploading IOS image file on a fresh device or just upgrading with a latest version, make sure the version of the IOS is compatible with your device and you have enough flash memory. Use ‘show version’ and ‘show flash’ command for this.
In order to upload the IOS file into the device you require a TFTP server. Once you have the TFTP server installed in your system, it has to set in the server mode then ping your Cisco device to check for connectivity. Now you are good to go.

IOS uploading process:
. Launch the TFTP server and set the default directories for upload and download
In the privileged mode, type the command ‘copy tftp flash’. This will copy the IOS file in the upload directory to the flash memory
. When prompted for the address of the remote host, type in the IP address of your system
. And when prompted for the source file name, type in the IOS image file name and add the extension .bin
. Once the erase and upload process is done, the device restarts and boot under the new IOS.

When the IOS is corrupted of erased:
If something goes wrong, like uploading a non compatible IOS image or the image gets corrupted, the devices gets booted in a ‘ROM monitor mode’ which is like the ‘safe mode’ in Windows. This can be identified with the prompt ‘hostname (boot)>

This is possible because an operating system is loaded in the ROM memory of the device to boot in case the IOS image fails and since this OS is in the ROM memory, there is no question of it getting corrupted.
Now you can continue the process of uploading IOS and make sure you don’t make any mistakes this time.

Some copy commands:
To copy from router to system: R#copy run tftp
To copy from system to router: R#copy tftp run
To copy from flash to system: R#copy flash tftp
To copy from system to flash: R#copy tftp flash
For all the above copy commands to work TFTP server should be running and the router should be able to ping that system.

TFTP servers are small in size and available for free download. There are a lot of free TFTP servers out there, pick one that’s easy to use.
If you are using Windows Visata, you won’t see HyperTerminal in that. You can download this for free from internet.

Digg ThisAdd To Del.icio.us Add To Furl Add To Reddit Fav This With Technorati Add To Yahoo MyWeb Add To Newsvine Add To Google Bookmarks Add To Bloglines Add To Ask Add To Windows Live Add To Slashdot Stumble This

Cisco IOS Modes of Operation

Commands can be executed in Cisco IOS software under access modes: User and Privileged. The commands in the User mode is in a way, a low level access version of the Privileged mode.

The below table explains the different modes, what can be done in these modes and the prompt telling you which mode you are in.


User mode: You enter this mode when you start a router. You can see ‘Router>’ prompt. Command like ‘ping, telnet, and rlogin’ run in this mode, also you can get information regarding the IOS if you type ‘show version’. So this mode gives you information but does not let you make any modification in the configuration. For any configuration or modification of the router you have to enter into the privileged mode by giving the command ‘enable

Privileged mode: You will be prompted to enter a password in order to access this mode (while configuring a router for the first time, the password for the privileged mode can be avoided but that’s a security risk). You can modify the router configuration, the interfaces on the router or create an initial configuration following the sub-modes.

In order to make things easier, the sub modes can be identified from the prompt. For example, the privileged mode shows ‘router#’ and if you enter the command ‘configure terminal’ here, the prompt changes to ‘router (config) #’, so this tells you that you are in the ‘Global Configuration Mode’

A list of every command that run in each mode can be displayed by entering ‘?’ while in that particular mode, so this makes things a lot easier. Also you don’t have to type every command, you just have to type the first few letters and let the IOS auto-complete it.
Example: Instead of typing ‘Router#configure terminal’ you can type ‘Router#conf ter

There are a few Hot Keys that will help you work faster while working on Cisco IOS,

CTRL A Moves cursor to the beginning of the line
CTRL E Moves cursor to the end of the line
CTRL B Moves cursor back one character
CTRL F Moves cursor forward one character
ESC B Moves cursor back one word
ESC F Moves cursor forward one word
CTRL D Delete one character
Backspace Delete one character to the left of cursor
CTRL R Redisplays a line
CTRL V Erases a line
CTRL W Erases a word
Ctrl Z Exits configuration mode
TAB auto completes partially entered word

Digg ThisAdd To Del.icio.us Add To Furl Add To Reddit Fav This With Technorati Add To Yahoo MyWeb Add To Newsvine Add To Google Bookmarks Add To Bloglines Add To Ask Add To Windows Live Add To Slashdot Stumble This

Connecting the Cisco IP phone 7940G

The inbuilt Cisco two-port Ethernet switch allows for a direct connection of the IP phone to a 10/100BASE-T Ethernet network via an RJ-45 interface. A single LAN connection will be enough for both the phone and a nearby PC.

The system administrator can designate separate virtual LANs (VLANs) for the PC and Cisco IP Phones providing improved security and reliability of voice and data traffic.

The Cisco IP Phone 7940G can also receive power down the LAN from any of the Cisco inline power-capable blades and boxes

Network Requirements
.The network must have a working VOIP network, which means Voice over IP (VoIP) configured on your Cisco routers and gateways
. Cisco CallManager* Release 3.0 or higher installed in your network and configured to handle call processing
. IP network that supports DHCP or manual assignment of IP address, gateway, and subnet mask

Adding a Cisco IP Phone Using Cisco CallManager
The IP phone has to be added to the CallManager before we can actually use it. This is done with Cisco CallManager Administration using either auto-registration or without auto-registration.

Auto-registration allows you to automatically add Cisco IP Phones to Cisco CallManager Administration simply by plugging them into a Cisco CallManager network. Auto-registration automatically assigns a directory number (selected from a range of numbers) to the telephone.

By default, auto-registration is turned off. When Cisco CallManager Administration is configured, you can turn on auto-registration by specifying a range of numbers from which auto-registration can choose directory numbers. Then, when new phones are added, they are automatically assigned the next available directory number. If a phone is moved to a new location, its phone number does not change.

Turning on Auto-Registration:
.Open Cisco CallManager Administration.
.Click Configuration.
.In the Auto-Registration area, click Configure. Type the start and end directory numbers (provided by the telephone company).
.Click Update. (The range of directory numbers auto-registration can use is configured, and auto-registration is enabled. When a new phone is added to the system, its directory number is automatically assigned by auto-registration).

Turning auto-registration off prevents unauthorized devices from registering with and gaining access to the Cisco CallManager.

Turning off Auto-Registration:
.Open Cisco CallManager Administration.
.Click Configuration.
. In the Auto-Registration area, click Configure. ( Type the same directory number in both the start number and end number boxes. For example, type 1000 as the start number, and 1000 as the end number).
.Click Update.( Auto-registration is turned off. New phones added to the system must be manually configured in Cisco CallManager Administration).


*Cisco CallManager: A software that runs on a Windows 2000 server and sets up and tears down calls between phones, integrating traditional PBX functionality with IP network. Cisco CallManager manages the components of the IP telephony system—the phones, access gateways, and the resources necessary for such features as call conferencing and route planning.

(More on CallManager some other time…)

Digg ThisAdd To Del.icio.us Add To Furl Add To Reddit Fav This With Technorati Add To Yahoo MyWeb Add To Newsvine Add To Google Bookmarks Add To Bloglines Add To Ask Add To Windows Live Add To Slashdot Stumble This

Cisco IP phone: 7940 series

.

IP phone front view and buttons.
1 - Handset light strip: Indicates an incoming call or new voice message
2 - Phone screen: Shows phone features
3 - Model type: Indicates your Cisco IP phone model
4 – Programmable buttons
· Phone lines
· Speed-dial numbers
· web-based services (eg: Personal address book button)
· Phone features (eg: privacy buttons)
5 – Footstand button: Allow you to adjust the angle of the phone base
6 – Directories button: Opens/closes the Directories menu. Use it to access call logs and corporate directories.
7 – Help button: Activates the help menu.
8 – Settings button
9 – Speaker button
10 – Mute button
11 – Headset button
12 – Volume button
13 – Services button; Opens/closes the Services menu.
14 – Message button: Typically auto-dials your voice message services.
15 – Navigation button
16 – Keypad
17 – Softkey button – Each activates a softkey option displayed in the screen.

Cisco IP phone back end connectivity:

1 – DC adapter port (DC48V) for phones not provided with inline power.
2 – AC to DC power supply
3 – AC power chord
4 – Network port (10/100SW) for connecting to the network
5 – Access port (10/100 PC) for connecting your phone to your computer
6 – Handset port
7 – Headset port
8 – Footstand button


Lines v/s Calls:
Lines: Cisco IP phone supports up to two lines. The number of lines available is decided by the administrator and you can see the number of lines available on your phone screen.
Calls: Each line can support multiple calls. Therefore, you can handle several calls on the same line itself. Default number of calls is 4; it can be up to a max of 200 calls.


The features and functions of IP phones are surprisingly easy for anyone to understand. I don't think I'll have to explain it here. :)

Digg ThisAdd To Del.icio.us Add To Furl Add To Reddit Fav This With Technorati Add To Yahoo MyWeb Add To Newsvine Add To Google Bookmarks Add To Bloglines Add To Ask Add To Windows Live Add To Slashdot Stumble This

IP Phones

An IP phone uses Voice over IP technologies allowing telephone calls to be made over the internet instead of the ordinary PSTN system. Voice over Internet Protocol is a protocol optimized for the transmission of voice through the Internet or other packet switched networks.


The most attractive part of implementing such a system is the lower calling cost. When calling other IP phones over the internet one pays for the fixed cost of internet bandwidth. Therefore IP phones are widely used in making international calls in Call centers and other business organizations.


All you need to do is to get an IP phone adapter from your VoIP service provider and that’s it. The good thing about using IP phones is that you do not need any special equipment to make it work, just the adapter. When you use IP phone systems, it works with an Ethernet port (or also called RJ-45) rather than using a regular wall phone jack. When use your IP phone service to make calls, your digital IP phone will connect through your broadband Internet modem.

Advantages of VoIP:

If you have a broadband connection with either DSL or cable, then you can use VoIP to make low cost calls. For a PC-to-PC phone call it can even be no cost to any other computer anywhere in the world (that has VoIP service installed as well, of course). Skype, Gtalk and Yahoo messenger provides this service. While there is usually a cost to make a PC-to-phone connection, it is usually less than a “traditional” long distance call.

Many VoIP service providers will charge a monthly fee allowing you to make unlimited calls within a specified geographical area, with a nominal extra charge for calls outside that set area. VoIP provides the advantage of portability if you are a traveler, you just have to sign in to your VoIP service wherever you are and make the call.

This portability is available for phone-to-phone VoIP service as well. Your VoIP service provider will provide you with an internet phone number that follows you wherever you go.

Services like call forwarding, call waiting, voicemail, caller ID, three-way calling and more are available through your IP phone, usually at no extra charge. You can also send data, as you would expect with a broadband internet connection, like pictures and documents, all while talking on the phone.

Disadvantages of VoIP:

The biggest problems of VoIP are power interruptions, quality of service and reliability.

The normal phones are not powered by your power line and thus they work when you have a power outage. These phones are powered by the phone line itself. This isn’t the case with an IP phone. If the power goes out, then there is nothing to power your internet connection or your IP phone.

There are also issues with VoIP sound quality and reliability. Just like any data sent over the internet, it is sent through the network scrambled into “packets”. Email and other documents sent over the internet are easily “reassembled” at the other end for a seamless transmission. Due to the real-time nature of voice communication, this reassembly process becomes more of a problem with VoIP. In order to minimize the delay of the voice connection, some data packets may occasionally need to be “dropped” if they don’t arrive in time, resulting in short periods of silence in the audio stream.

The amount of dropped data depends on the distance and speed of the connection. High traffic networks may experience more dropouts, especially at times of peak usage. One workaround that service providers can use is to create dedicated data paths for audio transmission.

I’ll explain about the popular 7940 series Cisco IP phone and how it is configured in another post.

Cheers ;)

Digg ThisAdd To Del.icio.us Add To Furl Add To Reddit Fav This With Technorati Add To Yahoo MyWeb Add To Newsvine Add To Google Bookmarks Add To Bloglines Add To Ask Add To Windows Live Add To Slashdot Stumble This

The Ping Command

.
I’d say the ping and traceroute commands are the simplest yet the most powerful commands in network troubleshooting. It comes very useful while isolating network hardware problems and incompatible configurations.

Ping (Packet InterNet Grouper) works by sending ICMP “echo request” packets to the target host and listening for ICMP “echo response” replies. Ping estimates the round-trip time, generally in milliseconds, and records any packet loss, and displays a summary.

ping 127.0.0.1 - This command pings the loopback address and verify the TCP/IP configuration.
ping IP_address_of_local_host - This veries that the local computer is added to the network correctly
ping IP_address_of_default_gateway - This command verify that the default gateway is functioning and that you can communicate with a local host on the local network.
ping IP_address_of_remote_host - You can ping the IP address of the remote host to verify that you can communicate through a router.

Shown below is a picture perfect scene. everything is ok in this ping reply.

Microsoft Windows XP [Version 5.1.2600]
(C) Copyright 1985-2001 Microsoft Corp.
C:\Documents and Settings\home>ping comp1
Pinging comp1.homenet.com [10.161.133.26] with 32 bytes of data:

Reply from 10.161.133.26: bytes=32 time<1ms ttl="127">

Ping statistics for 10.161.133.26: Packets: Sent = 4, Received = 4, Lost = 0 (0% loss), Approximate round trip times in milli-seconds: Minimum = 0ms, Maximum = 0ms, Average = 0ms

as you can see, the packet loss is 0% which means that the communication is healthy. This may not be the case all the time, but then the ping reply can give you a lot of information regarding the network. Since it's almost 3 in the morning, I'll write about it in the next post - hopefully :)

Check out these Ping command prefixes, they are extremely useful. You will get the below mentioned list by typing the following command ping /? in the command line.

ping -t a.b.c.d - This command keeps pinging the IP address a.b.c.d until you give the break command Ctrl+C. Its useful when you have to see the effect on connectivity in realtime while doing some changes.
ping -a a.b.c.d - This command resolves IP address to host names. Put in the IP address and you will get the host name of the system.
ping -n 20 a.b.c.d - This command can be used to send 20 (or any number of) echo request to a particular IP.
Similarly there are others which are less used compared the above three.
-l size - Send buffer size.
-f - Set Don't Fragment flag in packet.
-i TTL - Time To Live.
-v TOS - Type Of Service.
-r count - Record route for count hops.
-s count - Timestamp for count hops.
-j host-list - Loose source route along host-list.
-k host-list - Strict source route along host-list.
-w timeout - Timeout in milliseconds to wait for each reply.

That's all for now. Gotta catch some sleep ;)

Digg ThisAdd To Del.icio.us Add To Furl Add To Reddit Fav This With Technorati Add To Yahoo MyWeb Add To Newsvine Add To Google Bookmarks Add To Bloglines Add To Ask Add To Windows Live Add To Slashdot Stumble This

TACACS

.
Terminal Access Controller Access-Control System (TACACS) is a remote authentication protocol that is used to communicate with an authentication server commonly used in UNIX networks.
TACACS allows a client to accept a username and password and send a query to a TACACS authentication server, sometimes called a TACACS daemon or simply TACACSD. This server is normally a program running on a host. The host would determine whether to accept or deny the request and send a response back. The TIP would then allow access or not, based upon the response. In this way, the process of making the decision is "opened up" and the algorithms and data used to make the decision are under the complete control of whoever is running the TACACS daemon.

The below diagram shows user accessing the network through the Network Access Server and then disconnecting.


  • Network Access Server get username/password pair from remote user, and sends this with a 'Login' to the TACACS Server (Authentication phase).
  • When the user and password combination is valid then the TACACS Server sends a 'Reply' accepted.
  • The NAS sends a 'Logout' request to permit the TACACS server to go into SLIP mode.
  • The TACACS server replies with a 'Reply' accepted and logs the user out.

TACACS protocol provides access control for routers, network access servers and other networked computing devices via one or more centralized servers.

A later version of TACACS introduced in 1990 was called XTACACS (extended TACACS). These two versions have generally been replaced by TACACS+ and RADIUS in newer or updated networks. TACACS+ is a completely new protocol and is therefore not compatible with TACACS or XTACACS.

TACACS is an encryption protocol and therefore less secure than the later TACACS+ and Remote Authentication Dial-In User Service protocols.

Digg ThisAdd To Del.icio.us Add To Furl Add To Reddit Fav This With Technorati Add To Yahoo MyWeb Add To Newsvine Add To Google Bookmarks Add To Bloglines Add To Ask Add To Windows Live Add To Slashdot Stumble This

Port and Port Numbers

.
A port number is a way to identify a specific process to which an Internet or other network message is to be forwarded when it arrives at a server. For TCP and UDP, a port number is a 16-bit integer that is put in the header appended to a message unit. Therefore, ports are typically used to map data to a particular process running on a computer.

Imagine IP addresses as the street address of an apartment building, and the port number as the number of a particular apartment within that building. If a letter (a data packet) is sent to the apartment building (IP) without an apartment number (port number) on it, then nobody knows who (which service) it is for. In order for the delivery to work, the sender needs to include an apartment number along with the address to ensure the letter gets to the right address.

In both TCP and UDP, each packet header will specify a source port and a destination port, each of which is a 16-bit unsigned integer (i. e. ranging from 0 to 65535), as well as specifying the source and destination network addresses (IP - numbers) among other things. A process may "bind" to a particular port to send and receive data, meaning that it will listen for incoming packets whose destination port matches that port number, and/or send outgoing packets whose source port is set to that port number. Processes may also bind to multiple ports.

As an example, a server used for sending and receiving email may provide both an SMTP (for sending) and a POP3 (for receiving) service; these will be handled by different server processes, and the port number will be used to determine which data is associated with which process. By convention, the SMTP server will listen on port 25, while POP3 will listen on port 110, although it is possible to use different ports.

Not all network transport layer use network ports; for example, although UDP and TCP use ports, ICMP does not.

The port numbers are divided into three ranges:
The Well Known Ports are those from 0 through 1023. The well-known port numbers are the port numbers that are reserved for assignment by the Internet Corporation for Assigned Names and Numbers (ICANN) for use by the application end points that communicate using the Internet's TCP or UDP.
The Registered Ports are those from 1024 through 49151. Registered port numbers are network ports in the range 1024-49151 (out of a range of 216 = 65536). They can be registered to certain protocols by software companies, similar to the way domain names are registered.
Eg: Port 28960 assigned for the game Call of Duty 2 (PC Version), Port 27010 assigned for Half-Life and its mods, such as Counter-Strike.
The Dynamic and/or Private Ports are those from 49152 through 65535. The dynamic port numbers (a.k.a private port numbers) are the port numbers that are available for use by any application to use in communicating with any other application, using the Internet's TCP or UDP.

List of TCP and UDP port numbers:

Before the arrival of ICANN, the port numbers were administered by the Internet Assigned Numbers Authority (IANA).

Digg ThisAdd To Del.icio.us Add To Furl Add To Reddit Fav This With Technorati Add To Yahoo MyWeb Add To Newsvine Add To Google Bookmarks Add To Bloglines Add To Ask Add To Windows Live Add To Slashdot Stumble This