
.
IP phone front view and buttons.
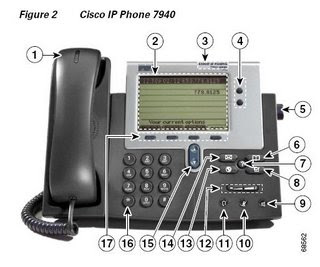 1 - Handset light strip: Indicates an incoming call or new voice message
2 - Phone screen: Shows phone features
3 - Model type: Indicates your Cisco IP phone model
4 – Programmable buttons
· Phone lines
· Speed-dial numbers
· web-based services (eg: Personal address book button)
· Phone features (eg: privacy buttons)
5 – Footstand button: Allow you to adjust the angle of the phone base
6 – Directories button: Opens/closes the Directories menu. Use it to access call logs and corporate directories.
7 – Help button: Activates the help menu.
8 – Settings button
9 – Speaker button
10 – Mute button
11 – Headset button
12 – Volume button
13 – Services button; Opens/closes the Services menu.
14 – Message button: Typically auto-dials your voice message services.
15 – Navigation button
16 – Keypad
17 – Softkey button – Each activates a softkey option displayed in the screen.
1 - Handset light strip: Indicates an incoming call or new voice message2 - Phone screen: Shows phone features
3 - Model type: Indicates your Cisco IP phone model
4 – Programmable buttons
· Phone lines
· Speed-dial numbers
· web-based services (eg: Personal address book button)
· Phone features (eg: privacy buttons)
5 – Footstand button: Allow you to adjust the angle of the phone base
6 – Directories button: Opens/closes the Directories menu. Use it to access call logs and corporate directories.
7 – Help button: Activates the help menu.
8 – Settings button
9 – Speaker button
10 – Mute button
11 – Headset button
12 – Volume button
13 – Services button; Opens/closes the Services menu.
14 – Message button: Typically auto-dials your voice message services.
15 – Navigation button
16 – Keypad
17 – Softkey button – Each activates a softkey option displayed in the screen.
Cisco IP phone back end connectivity:
 1 – DC adapter port (DC48V) for phones not provided with inline power.
2 – AC to DC power supply
3 – AC power chord
4 – Network port (10/100SW) for connecting to the network
5 – Access port (10/100 PC) for connecting your phone to your computer
6 – Handset port
7 – Headset port
8 – Footstand button
Lines v/s Calls:
Lines: Cisco IP phone supports up to two lines. The number of lines available is decided by the administrator and you can see the number of lines available on your phone screen.
Calls: Each line can support multiple calls. Therefore, you can handle several calls on the same line itself. Default number of calls is 4; it can be up to a max of 200 calls.
Calls: Each line can support multiple calls. Therefore, you can handle several calls on the same line itself. Default number of calls is 4; it can be up to a max of 200 calls.
The features and functions of IP phones are surprisingly easy for anyone to understand. I don't think I'll have to explain it here. :)


No comments:
Post a Comment